Overview
The Loxin™ anchor consists of two half shields that are pressed and held together by lugs which are recessed into the outer body. A tapered
steel nut is held captive by a crimped over legs at the base of the steel, the anchor is passivated zinc plated to resist corrosion.
The Loxin™ is clearly stamped on the outer surfaces of the shield with the thread size of the tapered expander nut, as well as the diameter
of the outer shield (hole size), as is the case with most masonry anchors, they are often referred to, even specified, by bolt size rather than
outside diameter.
Loxin™ is almost a generic term and is often referred to as a method of fastening rather than a description of the product.
The hole size required to install a Loxin™ is considerably larger than all other masonry anchors. The rather large expander nut fitted into the bottom of the shield causes this.
Because of this fact, a greater degree of expansion is achieved when the bolt is tightened down into the nut.
The Loxin™ is suited to both solid and hollow masonry materials.
| Features |
Benefits |
| Flush setting |
No protrusions when not in use |
| Female thread |
Bolts and threaded studs of any length or type can be used |
| Shallow embedment |
Reduces chance of drilling into rebar, therefore faster drilling |
| Captive expander nut |
Held in place at the extreme of the anchor length for maximum embedment |
Uses
Where would I use a Loxin™ anchor?
- Where I require a neat machine bolt head finish
- Where I require a neat flush finish to the work surface
- Where the fixture or machine is likely to be moved later
- To obtain a firm fastening into less dense masonry materials
- To fasten into hollow concrete masonry blocks
- As a general-purpose anchor that does not need any special setting tools
- Where the space between the bolt and the anchor inside diameter allows for some lateral movement for positioning
Installation
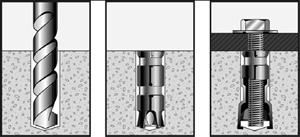
- Drill hole at recommended diameter and at least the depth of the anchor
- Remove debris by way of vacuum or hand pump, compressed air etc. Insert the Loxin™ nut end first until it is flush with the surface
- Insert the correct size bolt through the fixture into the Loxin™ and tighten
NOTE: It is important to pre-expand each anchor in turn before installation of the fixture, this will avoid any movement of the anchor and/or the tapered expander nut after the fixture is in position.
|