Overview
Toggles™ are not new, having been used extensively by tradespeople and the home handyperson as well. Once installed, they give
very positive fastening, spreading the load over the entire width of the toggle wing. They are ideal for installations requiring a
higher load when fastening to hollow wall (drywall) materials, i.e. plasterboard, plywood, cement sheeting and other thin section veneers.
For a Toggle™ to operate correctly, you must:
- Have a clear air space behind the material being fastened into
- Install the Toggle™ correctly in the first place
Ramset™ Toggles™ are manufactured from steel and have a passivated zinc finish to prevent corrosion and discolouring of the work surface.
There are many variations of the Toggle™ anchor available in the market place today, some are plastic or nylon, others are steel.
The 3/16” thread size is by far the most popular and universally accepted size. They are supplied in bulk packs of 100 or carded to suit the retail hardware stores.
A 1/8” thread size is also available for the smaller jobs.
Both countersunk and round head screws are supplied as an assembly in lengths of 50mm, 75mm or 100mm.
Gravity Toggles™, although more economical because of their simpler component structure will not do all of the many different fastening
applications. As their name implies, they work by the wing falling down once inserted through substrate. They will only be fully effective when
used in the vertical aspect, i.e. through a wall panel.
Spring Toggles™ are more versatile in that they will operate in both vertical and horizontal aspect as well as spreading the load evenly
on either side of the hole they were passed through. In many cases, they are as strong, if not stronger than, the substrate material they are
fastened through.
| Features |
Benefits |
| Fire resistant |
Ideally suited for ceiling installations (spring toggle only). |
| Wide wingspan |
High loadings in plaster walls and ceilings (Spring Toggle™ only). |
Uses
Suitable for fastening into cavity walls and ceiling giving an even distribution either side of the hole.
Installation
SPRING Toggle™
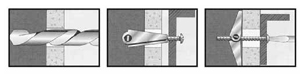
- Drill the correct size hole to enable the wings of the toggle to pass through the material being fastened to. A sharp drill bit with minimum pressure applied will prevent damage at the break through point
- Pass the screw through the fixture being fastened and screw the spring wings onto same, allow the end of the screw to protrude slightly through the yoke.
- Close the wings back along the length of the screw and check that there is sufficient length of screw to enable the wings to clear the thickness of material being fastened into.
- Press the closed wings into the hole and push the fixture and screw fully home. Check that the wings have snapped open on the reverse side by pulling back on the fixture
- Screw the fixing fully home maintaining a pull back pressure on the fixture to keep the toggle wings in contact with the surface. Do not over tighten to avoid stripping of the threads in the yoke
GRAVITY Toggle™
- Remove the fixing screw from the Toggle™. Check that it is of sufficient length to pass through the fixture and the thickness of wall panel with the wing folded back along the screw of the Toggle™ wing. This will ensure that the toggle wing will drop into the cavity when in place.
- Drill a clean hole through the wall panel. (Do not press heavily when breaking through to avoid tearing out the other side).
- Lay the Toggle™ along the screw with the longer leg to the end, the screw should only be engaged into the yoke with one or two turns of the thread protruding
- Letting go of the Toggle™, it should fall by gravity and hang across the end of the screw. Remove the screw from the Toggle™, pass it through the fixture and screw the Toggle™ head back on
- Install the fixture against the wall guiding the toggle through the hole and pressing home until it falls down into position on the other side of the wall
- Tighten the screw, at the same time, pulling back on the fixture to keep the Toggle™ in contact with the reverse side of the work surface. Do not over tighten to avoid stripping off the threads in the yoke
|